
Koi Pond Bottom DrainWhy You Need One and How to Fit It
Koi pond bottom drains explained: how they work, how many you need, pipe sizing, placement and how to connect them to a filter.
 SYSTEM CONCEPT
See the mechanism.
Understand the duty.
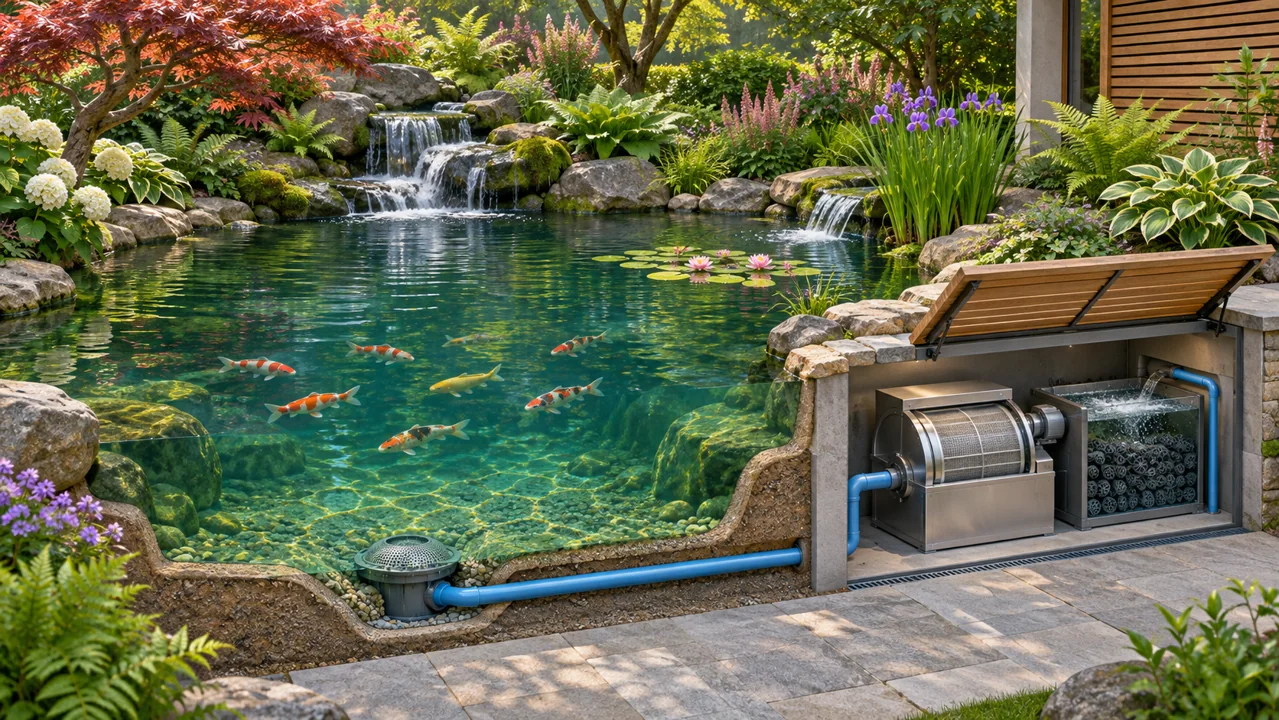
Select a route or a stage to inspect the process. The cutaway explains the equipment and water environment; it is a teaching illustration, not a project drawing.
Collect surface debris
Use the operating pond volume and actual loading.
A skimmer can collect floating debris. Its duty and position depend on the pond layout.
- Use the operating pond volume and actual loading.
- Review collection, filtration, oxygen and return distribution.
- Record water chemistry and changes in fish behaviour.
What a bottom drain does
Fish waste is heavier than water and collects on the floor. A drain at the lowest point catches it and pulls it to the filter with the pond flow. This keeps the pond cleaner, protects water quality and reduces the load on the biofilter.

How many do you need?
As a guide, one drain for every 15 m² of surface area, with extra for long or wide ponds. The floor must slope gently toward each drain so waste rolls into it. Large ponds often have several drains, each with its own valve so flow can be balanced.
Work with your own numbers.
Use the tools below to explore the relevant arithmetic. Enter measured values or declared assumptions. An estimate does not establish equipment capacity, biological performance or a safe operating limit.
Pipe velocity check
Calculate mean velocity using actual flow and the pipe’s internal diameter.
Assumptions and limits
Internal diameter differs from nominal outside size. Velocity alone does not prove gravity capacity, solids transport, pressure loss or freedom from air locks.
Flow & turnover planner
Relate a measured water volume to a selected turnover time. Confirm the time from the application and hydraulic design.
Assumptions and limits
A planning allowance is your assumption. This calculation does not choose a filter, prove treatment capacity or account for pump head.
Convert units before you calculate
Planning arithmetic · inputs remain visible for review · example values are not operating recommendations
Pipe size and layout
| Flow | Suggested pipe |
|---|---|
| Up to about 15 m³/h | 75 to 90 mm |
| 15 to 30 m³/h | 110 mm |
| 30 to 60 m³/h | 125 to 160 mm |
| Above 60 m³/h | Multiple pipes or larger |
Guideline only. Check against your design flow and the head available.
Keep pipes short with gentle bends. Avoid long flat runs where solids settle. See gravity-feed pipework.
Installation points
- Set the drain levelIt should sit at the lowest point with the floor sloping to it.
- Seal the liner or concreteUse a proper flange for a watertight joint.
- Pipe to the filterSlope continuously toward the filter with no high spots.
- Fit isolation valvesSo you can balance flow or service the system.
- Test before fillingFill the pond partially and check for leaks.
Common problems
- Blocked drain: usually undersized pipe or flat runs.
- Fish trapped: use a grill with small enough gaps.
- Air in the line: check for high spots and fix.
Start with the operating pond
Use these questions to prepare a project brief or an operating review. Check an item only when the information has been recorded for your installation.
This checklist is a working aid in the current page session, not a saved maintenance record.
Koi Pond Bottom Drain FAQ
Do I really need a bottom drain?
It makes keeping a koi pond far easier. Without one, waste stays on the floor.
How big should the pipe be?
110 mm is a common minimum for a koi pond drain.
Can I add a drain to an existing pond?
It is possible but means cutting the floor, so planning it into a new build is far easier.
More guides related to koi pond bottom drain
Discuss your system with Pureflow.
Share your application, operating volume, actual flow, loading and the question you are trying to resolve.